
We will try through this tutorial to practice all what we have learned in the previous articles about Docker by deploying a multiple components’ project and linking them all together to deploy a complex project on Docker.
Through this Demo we will deploy a 3 tiers application which contains:
- Mongo DB database.
- Backend developed with Nodejs.
- Frontend developed with Angular.
- An addon to help us change source code of the frontend from inside the container.
We will also face some new features of docker, now that we have the chance to talk more about them to help us more to deploy a complex project on Docker 😊 .
Deploying the Database
For the database, we will be using the public image of MongoDB from Docker hub version 3.6.
We will specify the admin username and password through Environment Variables flag. We will also mount the databases directory to persist it on container shutdown.
In addition to that, we will add a policy that restarts the container automatically each time it goes down unless we stop it manually. And to make our project more secure, we will create a custom Docker network that will connect different containers.
First of all let’s create a named volume: since we don’t need to know where the data are mounted, we only need them to persist:
$ docker volume create database-dir
After that we need to create a new bridge network that will be isolated from other networks:
$ docker network create -d bridge my-network
Now let’s Launch our database:
$  docker run -d --name mongodb --restart always \
    -e MONGO_INITDB_ROOT_USERNAME=mongoadmin \
    -e MONGO_INITDB_ROOT_PASSWORD=mongopass \
    -v database-dir:/data/db  -p 27017:27017 \
    --network my-network \
    mongo:3.6
The “–restart” flag tells docker when to restart the container. As we specified, the container will always be restarted once it stops.
You can find more about restart policies here.
Deploying the Backend
You can clone the backend example from the GitHub repo from here.
$ git clone https://github.com/Ferios08/NodeJS-Demo.git
As you navigate the source code, you will notice that there are few Environment variables. Don’t worry about them now: we will define them on image and container creation:
- MONGO_URL: MongoDB IP address or hostname.
- MONGO_USER: MongoDB admin username.
- MONGO_PASS: MongoDB admin password.
- PORT: the port that the server will listen to.
For the MINGO_URL, we will use the “mongodb” container’s name as a hostname because they will both be available on the same network. So it will be accessible from the container’s name.
If you check the cloned repository you can find the Dockerfile there:
FROM node
WORKDIR /home/node/app
COPY . ./
RUN npm install

ENV PORT=
ENV MONGO_URL=
ENV MONGO_USER=
ENV MONGO_PASS=
ENV MONGO_DB=

EXPOSE $PORT
CMD ["node", "index.js"]
We initiated the environment variables and left their values empty because we will fill them later while running the container.
Let’s first build the backend docker image:
$ docker build -t mybackend .
We will now launch the backend container:
$  docker run -dit --name backend \
       --network my-network \
       -e MONGO_URL="mongodb" \
       -e MONGO_USER="mongoadmin" \
       -e MONGO_PASS="mongopass" \
       -e PORT="3000" \
       -p 3000:3000 \
       mybackend
You can check the logs to verify if the backend was launched successfully and connected to the database:

Deploying the Frontend
The Angular based frontend Demo can be cloned from here.
$ git clone https://github.com/Ferios08/Angular-RestAPI-Demo.git
It’s simple CRUD app that creates users, shows them and deletes the user once you click on it.
The frontend will connect to the backend through the network “my-network”: for that it has two Environment variables which are “API” and “PORT” that will be bound to the backend URL.
Environment variables in Angular can be painful to implement. So, we will skip defining them to save time and set them manually in this example.
Navigate to the src/app/services/user.service.ts file of the project, change the API and the PORT with your machine IP and NodeJS Port:

After setting the apiURL variable with the Backend’s url, you can build the frontend image based on the Dockerfile used in the cloned repository. Forget about the “Dockerfile-2” file for now, we will return to it later.
We will firstly use the following Dockerfile:
FROM node:lts
WORKDIR /app
ENV PATH /app/node_modules/.bin:$PATH

COPY package.json /app/package.json
RUN npm install
RUN npm install -g @angular/cli@9.0.1

COPY . /app
EXPOSE 4200
CMD ng serve --host 0.0.0.0
This Dockerfile won’t build the project, but it will serve it as an Angular project so we can inspect the code in real time and change it to inspect instant changes:
You can build the image with:
$ docker build -t frontend
Now we will run a container from this image. But first let’s create a named volume called “code”:
$ docker volume create code
Now let’s run the image:
$  docker run -dit --name frontend \
       --network my-network \
       -v code:/app/src \
       -p 4200:4200 \
       frontend
You may have noticed that we have linked the frontend to the network, and we have mounted the source directory of the Angular app to “code” volume.
Now we will run an app called “Theia” which is a web-based IDE that can run perfectly on Docker. We only need to give Theia access to the Angular source code so we will link it to the “code” volume:
$  docker run -it --init --name web-editor \
       -p 8080:3000 \
       -v  code:/home/project \
       theiaide/theia:next
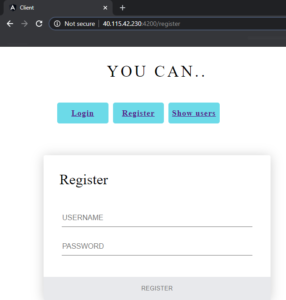
If we check the browser, we can find both of our apps there:
Let’s browse the code through Theia:
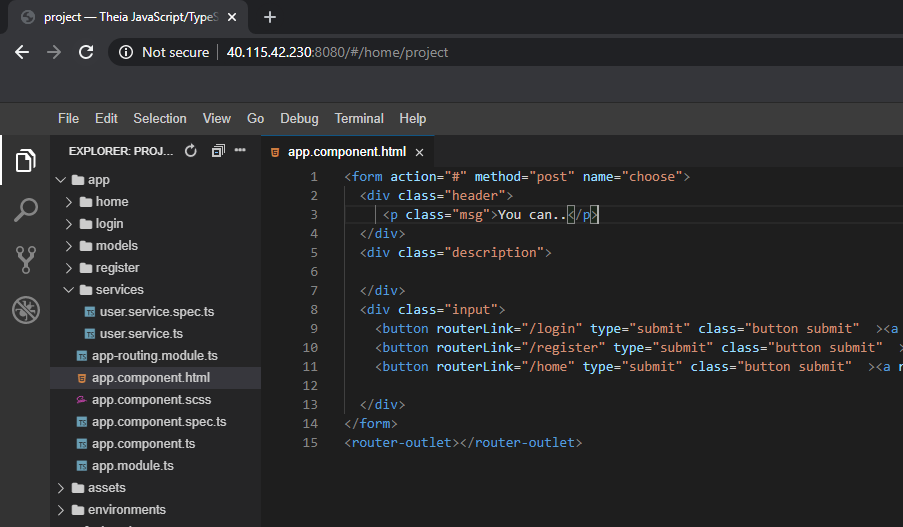
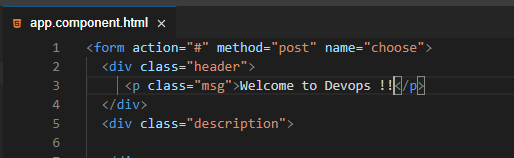
You can change source code on the editor and check for instant changes as the Angular server will reload automatically:
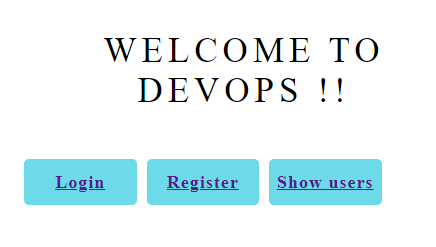
We can check the browser for changes:
Now try to create a user:
We can go even further with this!
To a better understanding of how to deploy complex project on Docker, let’s suppose that you want to build your web app and deploy it to production through a Nginx Web server. For that we will use a multistage Dockerfile that will install the dependencies, build the project then push it into a Nginx image. I’ve already created that Dockerfile for you which is called “Dockerfile-1”
We will backup the old Dockerfile first and rename the “Dockerfile-1” file:
$ mv Dockerfile Dockerfile-2 && mv Dockerfile-1 Dockerfile
Let’s take a look at the new Dockerfile:
# stage 1
FROM node:lts as node
WORKDIR /app
COPY . .
RUN npm install
RUN npm run build

################################
# stage 2
FROM nginx
# client is the app name
COPY --from=node /app/dist/client /usr/share/nginx/html
EXPOSE 80
CMD ["nginx", "-g", "daemon off;"]
We will now build that image:
$ docker build -t frontend-nginx .
Once that image is built, we can run it via:
$  docker run -dit --name frontend-prod \
       --network my-network \
       -p 80:80 \
       frontend-nginx
Note that our project is stateless, there is no need to persist any data. In addition, the typescript code from Angular is already compiled and built so there’s no need to make changes on it via the web-based IDE.
Now if we check the browser, we can find our Nginx Server running there:
And with that, we’ve deployed our project on docker with all their volumes and networks.
However,
You may have noted how hard it could be to link multiple containers: imagine having an application composed of dozens of containers and replicas that you should “Loadbalance” them manually to distribute load between them! Don’t worry, you won’t need do this on your own because that’s what orchestrators do.
So in the next tutorials, we will get into Kubernetes: the best orchestrator ever. We will discover what it really is and learn how to use it from zero to hero.